Friday 30 December 2011

Kerala Chicken Roast


Winter is definitely making it's presence felt in Bangalore this time, haven't taken off my sweater for the past few days!

Holiday Season (December) is one of my favourite times of the year. Not withstanding all the shopping and good cheer and general upliftment of spirits, it is a time for unrestricted appeasement of the soul, viz., indulgence in the finest of food. And that the time coincides with Winter, when the natural instinct is burrow and fill up while bulky outwear help the cause by concealing any recent additional pounds, is only testament to the cosmic forces that come together in encouragement of the indulgence!


We had a great time with family this past week at our native place and I still haven't got rid of the hangover. So much love, so much happiness, and last but not the least so much food! Oh how I miss everyone back home. Can't wait for another get together!

I admit I have been quite out of the blog world when I should have been posting recipes for Christmas and New Years. And yes I was cooking and eating and could have probably taken some pictures and blogged. However I was feeling frozen in place with inactivity for some absurd, inexcusable reasons. Believing you will forgive my lack of visits to your blogs and enthusiasm in blogging generally, I have a recipe for this very tasty Chicken Roast.

I got the recipe for this yummy Chicken Roast from the magazine "Vanitha". We enjoyed eating it and hope you do too. Here's Goodbye to 2011 and a warm welcome to 2012! Wishing you all a happy, joyous and blessed New Year!

Ingredients

Chicken (cut into medium size pieces)- 1 kg
Kashmiri Chilli powder - 1 tbsp (heaped)
Pepper powder - 1 tbsp (heaped)
Cloves - 7
Cinnamon stick - 4 pieces
Fennel seeds - 1 tsp
Turmeric powder - 1/2 tsp
Garlic - 2 to 3 cloves
Shallots/Pearl/Small onions - 12
Couscous (Kuskus) - 1 tbsp
Big onion (finely sliced) - 2 (medium)
Tomato (diced)-  2 (medium)
Potato (sliced) - 2 (small)
Curry leaves - 2 to 3 sprigs
Salt - to taste
Oil


Method

Dry roast cloves, cinnamon stick, fennel seeds for a few minutes and keep aside. Grind together kashmiri chilli powder, pepper powder, dry roasted spices, turmeric powder, garlic, shallots/pearl/small onions and couscous (kuskus) into a smooth paste and keep aside.

Fry sliced potato along with curry leaves with a pinch of chilli powder and turmeric powder till potato turns crisp. Keep aside.

Heat oil in a wok and saut'e big onions till light brown. Add ground paste and saut'e for a few minutes. Add tomatoes and saut'e till it turns soft and oil separates. Now add the chicken pieces and necessary salt into it and mix well. Cover and cook till almost done. Once chicken is almost done, separate the chicken pieces from the gravy. Heat oil in a pan and shallow fry these chicken pieces till golden brown. Add these shallow fried chicken pieces into the gravy and cook on a low flame till gravy reduces and thickens and chicken is cooked well.

Once chicken is cooked well, switch off flame and arrange on serving plate. Garnish with fried potatoes and curry leaves. Serve hot with pulav/roti/plain rice.

Notes:

1. The original recipe does not have tomato in it. I have used it in the above recipe.

2. Soak Couscous (Kuskus) for 1/2 an hour before grinding.

Source: Vanitha

Wednesday 21 December 2011

Mushroom Masala


There was a time when I used to be sceptical about buying mushrooms and trying to prepare a dish using them. But my hubby’s love for mushrooms have pushed me to try out different recipes with it.

Mushrooms stir fried with onions, bell peppers and spices. A simple dish, but the earthy mushrooms and bell peppers will make you forget how simple, and every mouthful will be a delight. When trying new veggies or meats, I try to stick with familiar flavours to begin with. And thus today I have saute’ed these lovely musrooms with simple spices that we use everyday in our kitchens.

Anyway, I must say my decision to experiment with mushrooms wasn’t such a bad idea after all, it in fact has made me extremely happy because my hubby dearest loved it! The first few times I tried cooking mushroom, turned out to be not-so-good experiences and left me feeling very hesitant to try these again. But what can I say, this dish definitely made me feel glad about my decision to cook with mushrooms. Yippee!!

So here is how I made Mushroom Masala. Enjoy!


Ingredients

Button Mushrooms - 250 gms
Bell Pepper/Capsicum (finely sliced; green) - 1
Big Onion (finely sliced) - 2 (big)
Garlic (crushed) - 3 to 4 cloves
Green chilli (slit lengthwise) - 1 (adjust as per spice tolerance)
Red Chilli powder - 1 to 1 1/2 tsp (adjust as per spice tolerance)
Garam Masala - 1/2 to 3/4 tsp
Turmeric powder - a pinch
Salt - to taste
Oil - 3 tsp

Method

Clean mushrooms well and finely slice them. Keep aside.

Heat oil in a wok and add finely sliced onions, capsicum and a pinch of salt into it. Saut'e till golden brown. Once the onions have browned, add crushed garlic and slit green chillies and saut'e for 1 or 2 minutes. Now, add red chilli powder, turmeric powder and sliced mushrooms and mix well. At this time, adjust salt and cover and cook for 1 or 2 minutes. After 2 minutes, remove the lid and sprinkle garam masala and toss well. Keep stirring till water evaporates and masala coats the mushroom well.


When the oil starts to sizzle around the mushrooms slices, your Mushroom Masala is done. Switch off flame. Cover and keep aside for 15 to 20 minutes.

Serve hot with Rotis/Chapathis.

Saturday 17 December 2011

Aloo Aur Parwal Ka Masala - Potato & Pointed Gourd in Thick Gravy


I have to confess that my husband, Reju was never huge on vegetarian food. I have always been a great fan of veggie food and lately Reju has joined me too. But the sad part is I do not have too many veggie dishes to my credit and thus I'm on a mission to experiment with new veggie delights!

Last week was one filled with great fun, lovely get-togethers with cousins and family. And of course there was loads and loads of eating too. Today's recipe is an attempt at recreating a yummy veggie dish I tasted at my aunt's place during that fun get-together. The minute I tasted it, I had decided that I was definitely going to try making it soon. I'm sure many of you have heard about the vegetable, Parwal (Potol). Well I had heard about it but had never tasted it before. It was my first time, and I have to say, I really enjoyed the flavor.


Anyway, the experiment that comes close to achieving the desired result is as in the recipe that follows. This veggie dish cooked in a delectable masala is sure to become a great hit. It is simple and can be cooked in minutes. Enjoy!

Ingredients

Pointed Gourd (peeled, deseeded & diced)- 8 to 10 (refer notes)
Potato (diced) - 3 (medium)
Onion (1 onion diced & 2 ground to a fine paste) - 3 (medium)
Ginger & Garlic paste - 1 1/2 tsp
Tomato (finely chopped) - 1 (medium)
Turmeric powder - 1 tsp
Kashmiri chilli powder - 1 tsp (adjust as per spice tolerance)
Coriander powder - 1/2 tsp
Garam masala powder - 1/2 tsp
Cumin seeds - 1 tsp
Bay leaf - 1
Sugar - 1 tsp
Salt - to taste
Coriander leaves

Method

Peel, deseed and dice the parwal into small cubes and keep aside. Peel and boil the potatoes and cut into small chunks and keep aside.

Heat oil in a wok, add the sliced onion and fry till onions turn golden brown. Keep aside. In the same wok, fry the diced parwal till it turns golden brown. Once browned, remove and keep aside.


In the same wok, add a little more oil and add bay leaf and splutter cumin seeds. Saut'e for a few seconds. Add the onion paste and saut'e for 5 minutes. Then add ginger & garlic paste and saut'e till raw smell disappears. Add the tomatoes and saut'e till tomato turns soft and oil separates. (approx 5 minutes) Once the tomato turns soft, add turmeric powder, kashmiri chilli powder, coriander powder, salt and sugar. Combine well. Now add the fried parwal and boiled potatoes to it and stir thoroughly till the masala coats the vegetable well. Pour 1 cup water into this mixture. Cover and cook till veggies are done and gravy starts becoming thick. Once the gravy starts becoming thick, add the fried onions and sprinkle garam masala onto it. Mix well and add freshly chopped coriander leaves into it. Switch off the flame and keep closed for 10 minutes. Serve hot with rotis/chapathis.

Notes:

1. It isn't compulsory to deseed the parwal, you do not have to if you prefer it that way.

2. Make sure the gravy is a semi-thick consistency.

3. You can also substitute parwal with other veggies like cauliflower etc...

Thursday 8 December 2011

Spicy Mutton Roast


It has been a while since I made mutton at home. As you already might know, lamb or mutton is a very famous meat in Kerala. Most people are very enthusiastic about dishes involving lamb. It is rich, soothing and just makes you happy at the end of the meal. Christmas is a season to be jolly, and also eat, eat and eat! Be it an authentic traditional spread or a creative fusion of dishes from different parts of the world, Christmas always involves a lot of tasty delicacies, mutton or lamb (in any form) being a constant on the menu.

Getting good quality mutton is always an issue in Bangalore. Best to buy it from a good store. Luckily for me, there is this beautiful cold store called “New Frosty’s” that sells any kind of meat, poultry and seafood under the sun! Hurray! So I bought some fresh tender mutton from this store, expressly cut them into medium size pieces and put together this dish… Fried onions to a golden brown to produce that slightly sweet and caramelized flavour, paired it with fragrant and flavourful spices that takes this dish to the next level. The flavour of lamb, onions and spices blends in to make this exotic treat.


I got this recipe from mariasmenu.com, Thank you Maria for this lovely dish. I love it because it never goes wrong and is simply awesome.

Serve it up with hot rotis, parathas, or plain rice and succumb to the magic it weaves.

Ingredients

Mutton (cut into medium sized pieces) - 1 kg
Big Onion (finely sliced) - 4
Ginger & Garlic paste - 3 tsp each
Shallots/Small/Pearl onion (coarsely crushed) - 6
Red Chilli powder - 1 1/2 tbsp (adjust as per spice tolerance)
Turmeric powder - 3/4 tsp
Garam masala - 1 1/2 tsp
Fennel (perumjeerakam) powder - 1 tsp
Water - 1/4 to 1/2 cup
Salt
Oil (preferably coconut oil)
Curry leaves

Method

Heat oil in a pressure cooker and add sliced onions. Saut'e till onions turn golden brown. Add ginger & garlic paste along with crushed shallots/small/pearl onions and curry leaves and saut'e for a few minutes.

Mix the spice/masala powders with a little water or oil to make a semi-thick paste. Add this spice/masala paste to the onion mixture and saut'e till raw smell disappears and oil separates. Once oil has separated, add the mutton pieces and salt. Mix well and saut'e for 5 minutes. Now add water. Cover and cook till done. (15 minutes approximately) Once cooked and pressure has released, open the lid of the pressure cooker. Make sure the gravy is thick, if there is any excess gravy, reduce it to a semi-thick consistency. (retain 1/4 to 1/2 cup of gravy approximately in the curry)


To roast the mutton, transfer the curry to a non-stick pan and fry on a low flame till it is roasted well. (roast till moist or dry as per your taste)

And here you have yet another Christmas special, Spicy Mutton Roast, a dish packed full of flavour and can be prepared in a jiffy. You might think this dish too simple, but believe me it will be an instant hit! I guess sometimes the simple things in life produce the best results.

Notes:

If the pressure cooker is non-stick, you can do the roasting process in the cooker itself.

Do not add more than 1/2 cup water to cook the mutton.

If you want the roasted mutton to be dry, do not retain any gravy after cooking the mutton, let it evaporate completely.

Source: mariasmenu.com

Thursday 1 December 2011

Kozhi Piralan


Wow, it's December already! In a few weeks, it will be X'mas and New Year!! Feels like it was only yesterday that it was New Year's eve! Every week seems to be simply whizzing by...

As I already mentioned I got to spend a few days at both (Reju & myself) our homes over the last one month and have returned with a few good tried and tested yummy home recipes! :) So watch out, authentic recipes from different parts of India and other places are coming your way which will help make your life easy while hosting an elaborate dinner menu.

I always have chicken stocked and stacked away in my freezer because we have it atleast twice a week. Today's recipe was a combination of comfort and nostalgia, reliving flavours from my childhood and very easy to make. This chicken dish is my mom's creation and has always remained a real winner among all of us. Spice masalas and the subtle yet fresh taste of the pearl onions makes this dish a treat to your palate and leaves you wanting for more. The simple elements and ingredients of this dish makes it an even bigger hit!

So here we go, a simple and tasty chicken recipe with flavours from my hometown Kerala. I have shared below the way I cook them and I hope you will enjoy this as much as we did. Have a good weekend.

Ingredients

Chicken - 1 kg

For Marination

Shallots/Small/Pearl onions (finely sliced) - 18 to 20
Big onion (finely sliced) - 1/2 of 1 big onion
Garlic - 2 to 3 cloves
Green chilli (slit lengthwise) - 1
Curry leaves
Kashmiri Chilli powder - 2 tbsp
Pepper powder - 1 to 1 1/2 tsp
Turmeric powder - 1 1/2 tsp
Garam masala - 1 & 3/4 tsp

For Masala

Big onions (finely sliced) - 2 (big)
Oil (preferably coconut oil for enhanced flavour)


Method

Make small gashes on the chicken pieces and marinate it with all the ingredients listed under "For Marination". Let it rest for 1/2 an hour at room temperature.

Cook the marinated chicken in a pressure cooker with 2 tbsp water till almost done. (after the first whistle, reduce the flame to low and keep for a minute and then switch off flame) Once pressure releases, open the lid of the cooker and separate the chicken pieces from the gravy. (make sure you have 1/4 to 1/2 cup of gravy. If in case, you have more gravy than required, reduce it to the desired quantity.) Leave it aside to cool.


Heat oil in a wok and saut'e finely sliced big onions till it reduces in quantity. Drain oil and keep aside. In the same wok, add a little more oil if necessary and fry the chicken pieces till golden brown on both sides. Add the saut'eed onions into the chicken and stir continuously till onions turn golden brown. At this point, add the gravy and toss the chicken on a high flame. Stir till the gravy reduces and coats the chicken well. Switch off flame and serve hot with rice/chapathi/appam.

Source: Mama

Wednesday 30 November 2011

Mushroom Pulav


Hey everyone, hope you are all doing great and getting into the holiday mood. For those in the U.S. hope you had a blessed Thanksgiving. The shops are already full of X'mas decor and holiday goodies. Can't wait for Christmas. :) It's always a time to be happy and merry. I know there has been a long gap in my posts. I had a good holiday at our homes in Kerala and was busy settling down after getting back to Bangalore.

I'm sure you all have already begun preparing your special X'mas menu and I would love to hear about your menu plans. Are you planning an Indian spread or a traditional feast or a fusion of both?! With Christmas and New Year coming up around the corner, I decided to share a yummy vegetarian rice dish specially for my veggie friends, that can be cooked for Christmas or any special day. Simple yet yummy, this dish will leave you feeling very happy.

Usually when we talk of Christmas menu in Kerala, what normally comes to our minds are Mutton or Chicken Biriyani. Back in college, I always had vegetarian friends who would say, why not some vegetarian food for X'mas too?!! And so finally here we have a dish that will make all my veggie buddies extremely excited!


Today I have for you a tasty Mushroom Pulav. Mushroom as a vegetable might be a little bland and sometimes doesn't please everyone's taste buds. But with the right mix of spices and aromatics, this simple vegetable produces a dish quite scrumptious. All the flavours of the exotic spices infuse into the rice giving this pulav the perfect flavour.

We ate this for lunch today and thoroughly enjoyed it. Savour this as a one pot meal or with a chicken curry on the side (for my non-vegetarian friends) and you won't be disappointed. It's delicious.

Without further keeping you waiting, let me share my recipe for Mushroom pulav. Enjoy and keep visiting the blog for more yummy special Christmas recipes coming soon.

Ingredients

Basmati Rice - 1 cup
Water - 2 cups
Button Mushroom (sliced thin) - 200 gms
Big Onion (finely chopped) - 1 (big)
Green chilli (slit lengthwise) - 1
Cinnamon - 1 medium piece
Caraway seeds (black cumin seeds/shahi/kala jeera) - 1 tsp (refer notes)
Turmeric powder - 1/2 tsp
Salt - to taste
Green cardamom - 3
Cloves - 4
Bay leaf - 1
Star Anise - 1 or 2 petals
Coriander leaves - 5 tbsp
Mint leaves - 3 tbsp
Ghee - 2 tbsp

For Garnish

Cashew - 10
Raisins - 10
Big Onion (finely sliced) - 1 (small)


Method

Wash and soak basmati rice in water for 1/2 an hour. Drain and keep aside.

Heat ghee in a pressure cooker. Once hot, add the caraway seeds and saut'e for 25 seconds. Add chopped onions, green chilli and cinnamon stick and saut'e till onion turns golden brown. Now add the sliced mushroom along with turmeric and salt and saut'e till the mushrooms turn glossy and reduce in quantity. (make sure the water content of the mushroom disappears) Add the cardamom, cloves, star anise and bay leaves and saut'e for 2 minutes. Now add the basmati rice and stir constantly on a medium flame for 5 minutes till the rice turns glossy and starts crackling. Add the water and check for salt. (add more salt if necessary) Add chopped coriander and mint leaves. Close the pressure cooker (do not put the weight) and wait for high steam to come. Once high steam appears, reduce the flame to low or sim and leave it like that exactly for 5 minutes and then switch off flame. Open the lid exactly after half an hour.

Heat ghee in a pan and fry onion, cashew and raisin.


Separate the rice with a fork without pressing it too much. (refer notes) Garnish with fried onion, cashew and raisin.

Notes:

If in case, you do not have caraway seeds, you can use a mixture of cumin seeds and fennel seeds in equal proportion (1/2 tsp cumin seeds & 1/2 tsp fennel seeds)

I have cooked the rice in my own style of cooking basmati rice since I find this an extremely easy method. But you can choose your most convenient method of cooking the same.

Tuesday 25 October 2011

Khatti Meeti Dal Chawal and Shubh Diwali!!! :)


I know, I know you must be wondering, what, dal chawal and Diwali?!! Well there are two answers to that. Firstly, I don't have too much of a sweet tooth and hence voted against making one. Secondly, we are off to Kerala tonight for a much awaited week-long vacation and thus I thought it wouldn't be a good idea to cook anything before that. And so I decided to make the very famous dal chawal, but with a slight twist! This will be a good wash down after you have had a good rich Diwali spread of yummy food and delicious sweets and savouries.

It has been a little over a year since I moved to Bangalore with my husband. When we moved away from home, we left behind quite a few luxuries that we did not recognize as such until their loss was felt..immensly! One of those was the simple pleasure of having food that we grew up with, the simplest of meals like the Chor, Parippu curry and Meen Vevichathu (rice, lentils and fish curry; Kerala style). Though I make this quite regularly at home, the joy of having that cooked, lovingly, by our mothers in exactness to our preferences is a different feeling altogether. But luckily for us, we get to go home quite often and I make use of that opportunity to gobble all the yummy dishes cooked with so much of love! :) Can't wait for our trip home.


My husband and I are quite South Indian at heart when it comes to a daily meal. But we do love our chapathis and dals and other North Indian delicacies too. Rotis, Parathas, chole, dal and chawal, you name it, we like it. If there is the aroma of a good garam masala in the curry, then we are happy campers.

Dal is made differently (even pronounced differently; Dhal in the South and Dal in the North) across the country. Dal is actually not so much a South Indian staple, we have Sambhar for that. But with increasing culinary exposure and interaction, you find some form of it all over the place. But lovely, fresh aromatic basmati rice cooked along with dals is a popular dish among the North Indians. And so I decided to borrow the concept from the North and add a bit of my own flavours to it to make this yummy dal chawal, the perfect comfort food! It's simple, basic ingredients, tasty and when cooked with lots of love, tastes awesome! :)

Ingredients

Basmati rice - 1/2 cup
Water - 3 1/2 cups
Ghee/Oil - 1 tsp
Cumin seeds - 1/4 tsp
Cloves - 2
Green chilli (slit lengthwise) - 1 (small)
Garlic (finely chopped) - 5 to 6 cloves
Ginger (finely chopped) - 1 small piece
Onions (finely chopped) - 2 (small)
Tomato - 1 (small)
Cinnamon - 1 inch stick
Bayleaf (tejpatta) - 1
Carrot - 2 (small)
Peas – ¼ cup
Turmeric powder – ½ tsp
Red chilli powder – 1 tsp
Garam masala – ½ tsp
Salt
Pav bhaji masala – 2 tsp
Tamarind pulp – 1 tsp
Sugar – 1 tbsp
Coriander leaves
Peanuts - 1/4 cup (dry roasted)


Method

Wash and clean the dal and keep aside. Wash and soak the rice for ½ an hour and drain and keep aside.

Heat ghee in a pressure cooker and add cloves, cinnamon, bay leaf and cumin seeds. When cumin seeds crackles, add chopped garlic, ginger, green chilli and onions and saut'e till onion becomes light brown. Add chopped tomatoes and saut'e till soft. Now add all the veggies along with masala/spice powders and saut’e on a medium flame for 3 to 4 minutes. Add the rice and dal and mix well and saut’e for another 2 minutes on a medium flame. Add 3 1/2 cups of water along with salt and sugar and pressure cook for 3 to 4 whistles. Switch off the flame and allow steam to go completely. Once the steam has gone completely, add the roasted peanuts and coriander leaves and mix well. Serve hot.

And there was lunch in a few minutes! Piping hot rice doused with the nostalgic dal! Oh it was heavenly. Wishing you all a very Happy Diwali. Enjoy :)

Notes: You can add any veggies of your choice; like: Cauliflower florets - ½ cup; Brinjal – ½ cup; Beans – 1/4cup etc...

Friday 21 October 2011

50th post and Express Chicken Bites :)


First of all, I would like to thank all of you for your kind words sent through comments, emails and facebook messages. I much appreciate your lending an ear for my vents, the virtual hugs and support. I am going to continue blogging because I love experimenting with food and photographing it just too much and doing it brings me a lot of joy...

So here I present my 50th post with today's dish, Express Chicken Bites. This is a quick chicken starter/appetizer. This spicy flavoured chicken bites are perfect for a dinner party for friends and family.


This was one of the first recipes I learnt from amma, super chef and express cook (mom-in-law) and as the name of the dish suggests this can be cooked up in a jiffy. I did very badly want to make a sweet to celebrate this joyous day but voted against it because the weighing machine hasn't been very kind to me these past few days! So hope you enjoy this easy pleaser.

Ingredients

Chicken (cut into bite size pieces) - 250 gms (boneless; refer notes)
Shallots/Pearl/Small onions (finely sliced) - a handful (15 to 20 approx)
Curry leaves
Salt - to taste
Oil (preferably coconut oil)

For Marinade

Ginger & Garlic paste - 1/2 tsp
Red Chilli powder - 1/2 to 1 tsp
Garam Masala - 1/2 tsp
Coriander powder - 3/4 tsp
Turmeric powder - 1/4 tsp
Salt - a pinch


Method

Marinate the chicken with the ingredients listed under "For Marinade" and keep aside for atleast 1 hour.

Heat oil in a pan and saut'e shallots and curry leaves till onions become light brown and keep aside.

In the same wok, heat a little more oil and add the chicken pieces and shallow fry it till browned well on both sides. Now add the fried onions and curry leaves into it and mix well. Saut'e for a few minutes on a low flame till onions turn crisp and chicken is cooked well.

Source: Super cook Amma :)

Fresh flowers to say THANK YOU!!

I am so happy to have such lovely people who are constantly encouraging and complimenting my efforts. Without your support it would not have been such a great experience. Heartfelt thanks with bright fresh flowers from my personal photographic collection.


Gobi Biriyani


Biriyani/Biryani is perhaps the most widely consumed rice preparation in the world with maybe a few subtle variations across borders. It is a dish made with rice and a kurma (mixture of meat, seafood, or vegetables cooked with spices and yoghurt in a thick sauce) arranged in layers, mixed together, or sometimes even cooked together. The exact origin of the 'Biryani' was in Persia where nomads dug pits in the ground and placed covered pots with rice, meat, and spices in the morning only to find delicious aromas seeping out by evening. The dish was later brought to other parts of South Asia by travelling Iranian merchants. It found it's way to North India via Afghanistan and has since spread all over the country and evolved into distinct recipes in every nook and cranny and each region swears by the superiority of their version.
                                           
Meat/Chicken/Fish and other non-veg biriyani preparations have always been more popular than vegetarian biriyani. But today's recipe is a delicious vegetarian biriyani preparation made with cauliflower. For those of you who think, a vegetable biriyani can never be tasty, this dish will prove you wrong! Wholesome and packed full of flavour, it is definitely a treat to your tastebuds. Now, you don't have to break your head thinking of what to serve your vegetarian friends, here is a perfect one pot veggie meal!


Please make sure you refer my notes on how to cook ghee rice in an extremely easy way. This idea was given to me by my aunt (mom’s sis), Sheilamama, who is a fabulous cook. Thanks Sheilamama for this wonderful tip. And believe me friends, rice cooked this way is just perfect. Say goodbye to mushy and squashed up basmati rice!

Make sure you bookmark this recipe and try it out sometime soon. Both Reju and I were very happy people after the very first spoonful. :) Happy cooking.

Ingredients

For Ghee Rice

Basmati Rice - 1 cup
Water – 1 1/2 cups
Ghee/Oil - 1 tbsp
Big onion (finely sliced) - 1
Cumin seeds - a pinch
Fennel seeds - a pinch
Cardamom - 2
Cloves - 4
Cinnamon - 1 inch piece
Salt - a pinch

For Marination

Cauliflower (finely sliced) - 1 (big)
Red chilli powder - 1 tsp
Turmeric powder - 1/2 tsp
Salt - a pinch

For Masala

Big onion (finely sliced) - 3
Tomato (finely sliced) - 2
Ginger & Garlic (finely chopped) - 1/2 tsp each
Green chilli (coarsely crushed) - 4
Garam masala - 1/2 tsp
Cumin (jeera) powder - 1/2 tsp
Mint leaves - 1/2 cup
Coriander leaves - 1/2 cup
Salt - to taste

For Garnish

Cashew – 10 to 15
Raisins – 12 to 15
Big onion – 1


Method

To prepare Ghee Rice (refer notes)

Heat ghee/oil in a pot and fry cashew, raisin and big onion and keep aside. Soak rice in water for half an hour. Drain it and keep aside. Saut'e cumin seeds, fennel seeds, cardamom, cloves and cinnamon for a few seconds. Add finely chopped onions and saut'e till it turns soft and transparent. Now add the rice and fry till glossy. Add water and a pinch of salt into it and cover with lid. Bring it to a boil. When it begins to boil, reduce heat. When the water absorbs and holes appear on top, switch off the flame. Keep the lid closed for half an hour. Separate the rice with a fork without pressing it much.

To prepare Biriyani

Marinate the cauliflower with the ingredients listed under "For Marination" and keep aside for 10 minutes. Fry the marinated cauliflower slices till crisp.

Heat oil/ghee in a wok and add finely sliced onion to it. Saut'e till it becomes golden brown. Add crushed green chillies and chopped ginger and garlic and saut'e for a few minutes till raw smell goes away. Add the garam masala and cumin (jeera) powder and saut'e for a few seconds. Now add the sliced tomatoes along with desired salt and saut'e till tomato turns soft and oil floats. Once oil separates, add the crispy fried cauliflower slices and mix well. Add coriander and mint leaves and toss well. Then layer the cooked basmati rice on top and cover and cook for around 4 minutes on a low flame.

Garnish with fried onions, cashew and raisins.

Notes:

1. Make sure the cauliflower is fried till crispy.

2. Easy way to cook ghee rice: Heat ghee/oil in a pressure cooker and add the spices. Saut’e for a few seconds. Add chopped onion and saut’e till it reduces and loses colour. Now, add the rice and fry till glossy. Add the desired water along with salt and stir. Cover and cook without the weight. When a high steam comes, turn the flame to low and cook for exactly 5 minutes and then switch off the flame. Open the lid after half an hour. Separate the rice with a fork without pressing it too much.

Thursday 20 October 2011

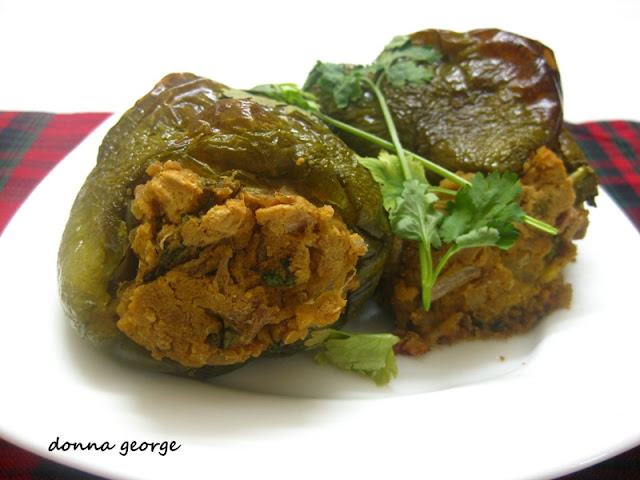
Stuffed Bell Peppers


So what is everyone doing today? Cooking up something special for your family? Sweet and simple home cooked? Or perhaps it is just like any other day? For me today was like any other day and so to take away the boredom, I decided to make something different from the usual sabzi to go with chapathis. Stuffed Bell Peppers, now how does that sound?

Well, I was introduced to this recipe from my lovely sis, Sharon who is an expert cook. I always wonder why she doesn't start a blog of her own, she is a fabulous cook. But again that would be very difficult because she has her hands full with her two wonderful kiddos and so I decided why not post a recipe passed on to me from her! So, Sharon this one is for you :)

You know what I really like about the oven? It does all the work for you! No standing over the pot for hours stirring or waiting to see if it is done. Pop in the stuff that you need cooked, set the timer for the appropriate cooking time, and then indulge yourself in a book or your favourite show! When done, it lets out a beep and you can take out a perfectly delightful meal.

Today I have for you one such simple recipe. It goes extremely well with chapathis or chawal (plain rice) and dal or also passes off as a wonderfully healthy and wholesome snack. As I had a few bell peppers in my refrigerator, I decided to make this tasty dish. This was my first attempt at making this dish and the end result made me very happy.

Roasted Bell peppers are to die for. The outer crust was crunchy, supple, light yet flavourful. This dish is pretty healthy and extremely easy to cook.

Something about these crunchy peppers just makes you want to jump in and devour the whole thing instantly! Try them and you won't be sorry :)

Ingredients

Red Lentils (Masoor dal) - 1 cup
Water - 2 1/2 cups
Green chilli - 2 to 3
Ginger & Garlic paste - 1 tsp each
Big Onion (finely chopped) - 1 (big)
Cumin (jeera) powder - 2 tsp
Coriander powder - 2 tsp
Garam masala - 1/2 tsp (optional)
Gram (besan) flour - 4 tbsp
Egg (beaten) – 1 (refer notes)
Salt - to taste
Oil
Coriander leaves


Method

Add water to the washed lentils and pressure cook till done. (approx 1 whistle on high and 1 or 2 minutes on low flame. Switch off and open after steam goes completely) Drain well.

Heat oil in a pan and add chopped onions. Saut'e till it becomes soft and changes colour slightly. Add green chilli and ginger & garlic paste and saut'e for 1 or 2 minutes. Throw in the spice powders and saut'e till raw smell disappears. Add cooked lentils along with salt and coriander leaves and stir. Now add the gram flour and combine well. Switch off flame and keep aside to cool. Add the beaten egg and combine the mixture thoroughly to bind. Refrigerate for 1 hour.

Cut open the top portion of the bell pepper and scoop out all the insides. Now stuff the dal mixture into it to it's brim. Repeat same procedure for all bell peppers. Brush the peppers lightly with oil and place onto a greased baking tray.

Pre-heat the oven at 100°C for 15 minutes. Place the baking tray into the pre-heated oven and roast the bell peppers till done. (30 minutes approx)

Notes:

Make sure the bell peppers are cooked well. It should be supple yet crunchy.

For healthier version, add only egg whites or avoid egg completely. I did not add it.

Wednesday 19 October 2011

Pineapple Salsa


Pineapple is such a perfect juicy fruit with it's vibrant tropical flavour that balances the sweet and tart. It is available year around at a nominal price. I made this salad with pineapple and a few other veggies in hand and it tasted delicious. Of course, you can be creative and throw in other veggies or even nuts. (roasted peanuts, almonds etc...)

Delicious, refreshing and no fat or cholestrol. This easy salad with pineapples and bell peppers is very gourmet-tasting! And if you have guests and have loads of cooking to do, here is an easy salad that can be done in a few minutes and it will definitely leave your guests wanting for more. Simply toss in some pineapple chunks with other simple ingredients and voila - a perfect salad that looks and tastes like summer itself! This summer salsa would be an excellent accompaniment to asian cuisine in particular (especially thai food) or you could even take it to a barbeque party or potluck where it's sure to be the talk of the party!


Try out this flavourful salsa and you are sure to love it.

Ingredients

Pineapple (cut into medium size cubes) - 1/2 of a whole (refer notes)
Red Bell Pepper/Red Capsicum (cut into medium size cubes) - 1 (big)
Carrot (cut into medium size cubes) - 1 (big)
Big Onion (diced) - 1 (small)
Lemon juice - a few drops (refer notes)
Pepper (crushed) - a pinch
Salt - a pinch


Method

Take a serving bowl, add all the ingredients into it and toss well. And that's it! Cool or what?!

Notes:

Choose a good ripe pineapple which is juicy and has a good balance of sweet and tart.

Make sure not to overdo the lemon juice because the sweetness of the pineapple is the key flavouring agent in this dish.


Tuesday 18 October 2011

Creamy Onion Soup


Sometimes there is nothing better than a simple soup to satisfy the soul. A soup that is easy to make, with familiar flavours but is presented differently, that warms you from the inside on a cold day. Soup is always perfect for a chilly day and are the easiest to prepare. They are always elegant and haute couture. I like such hands-free and no fuss meals. They are easy to make, taste great and leave you feeling full and happy! Besides, you can always use what you have and create variety easily.

So many posts with the word 'Simple', you must think I really mean business. I do! Stick with me and there will be more of it coming up.. :) The idea behind these meals was to maximise the time I get to spend with Reju on a weekly basis while still managing to get good food on the table that lent a little special touch. Plus this food blog keeps me on my toes, mentally and physically and that makes me very happy :)

I have always loved soup and still do. It surprises me that I have not posted more recipes for soup on the blog. The truth is, I have never tried many variations of soup. But I will try posting a few good ones when I come across them. I hope you will enjoy this soup as much as I do.

Ingredients

Big Onion (finely chopped) - 3 (medium)
Butter - 3/4 tbsp (refer notes)
Cornflour - 1 1/2 tbsp
Milk (boiled) - 2 3/4 soup bowls
Vegetable stock - 1/4 cup (refer notes)
Salt - to taste
Pepper - 1 to 1 1/2 tsp (black or white)
Cheese - 1 1/2 tbsp (refer notes)
Fresh Parsely (finely chopped) - 2 tsp (adjust as per taste) {optional}


Method

Heat butter in a pot and add chopped onions and saut'e till golden brown. (make sure it is browned and caramelized well) Add boiled milk and simmer for a few minutes. Add cheese along with pepper, salt and freshly chopped parsely and stir well. Now add vegetable stock and mix well. At this time, add cornflour and stir well till it starts thickening. (be sure to get rid of any lumps) Serve hot with sandwiches (chicken, egg or any filling of your choice) or as it is.

Notes:

1. I have added less butter to make it healthier. You can add more because it tastes better.

2. Please check:

http://culinaryexperimentsofanamateur.blogspot.com/2011/10/gobi-manchurian.html for instructions on how to prepare vegetable stock.

3. You can use any cheese, cream cheese, mozarella, or any cheese of your choice. You can also increase the quantity of cheese as per taste.

Source: Mum

Monday 17 October 2011

Gobi Manchurian


Have you ever eaten at these really small street joints that serve yummy Gobi Manchurian, Chilli Chicken and other delicacies?! I remember while studying in college, friends and I often frequented restaurants like these and they served the tastiest Chinese food that we would crave for almost every week! Of course, none of these dishes were authentic Chinese but had a huge influence of India in it too. Nevertheless, it tasted simply amazing! As I talk about it, my mouth waters. :) :)

Chinese food is a favourite around India and I have lost count of the number of Chinese joints I have frequented since college times. I am sure you will agree most of us Indians like Chinese food. A lot! So now we have invented all these Indo-Chinese dishes like Manchurian, which probably is a universal favourite. You might also have seen endless versions of Gobi Manchurian. I am no different and today I have the same for you.

Start your fun week with some awesome Gobi Manchurian! If you are not a fan already, I guarantee you will be. Have a good week, guys.

Ingredients

Cauliflower (cut into florets) - 250 gms
Cornflour - 1/2 cup
All Purpose flour - 1/2 cup
Egg (beaten) - 1 (refer notes)
Red Chilli powder - 1 to 1 1/2 tsp
Water - just enough to bind the ingredients
Capsicum (cut into cubes) - 1 (small)
Big Onion (finely chopped) - 2 (medium)
Ginger & Garlic (finely chopped) - 1/2 tsp each
Green chilli (slit lengthwise) - 1 (adjust as per spice tolerance)
Green Chilli sauce - 1 tsp
Soy sauce - 2 tsp
Tomato sauce - 4 tsp
Vegetable stock – 2 tbsp (optional; refer notes)
Pepper – 1 to 1 1/2 tsp (adjust as per spice tolerance)
Salt - to taste
Coriander leaves - to garnish
Oil


Method

Take a bowl and add cornflour, all purpose flour, a pinch of salt, red chilli powder, cauliflower, beaten egg and a little water and bind it all together. (Be careful not to add too much water, add just enough to bind all the ingredients together) Heat oil in a wok and deep fry the cauliflower pieces till golden brown. Keep aside.

Heat oil in a pan and saut'e ginger, garlic, green chilli and onions till onions turn light brown. Add chopped capsicum and saut'e for a few minutes. Now add the sauces and pepper powder and stir well for a few minutes. Check for salt and add if necessary. Throw in the fried cauliflower florets and toss well till everything is combined well. Pour the vegetable stock and toss on a high flame till dry. Switch off the flame and add coriander leaves and mix well. Serve hot as a starter or with rotis/chapathis/pulav.

Notes:

1. For healthier version, you can add only the egg whites or even omit the egg completely.

2. For preparing vegetable stock: Collect the waste bits of carrot, celery stems, spring onions, onion or any veggie and boil with water and salt for sometime. Strain and store in the refrigerator. You can also use store-bought vegetable stock.

3. You can make "Chicken Manchurian" following the above recipe.
Related Posts Plugin for WordPress, Blogger...